Aura OS documentation
Everything you need to set up and use Aura OS — the compliance and operations app for Australian NDIS SIL providers. Written for owner-operators and admins. Support workers get a worker-scoped experience described under Roles & permissions.
New to Aura? Start with What is Aura OS? and the sign-up walkthrough. Already running? Jump into the feature guides.
What is Aura OS?
Aura OS is the day-to-day operations app inside Clearline Health. It handles the records the NDIS Commission expects you to keep — shifts, handovers, medications, incidents, progress notes, policy reviews — and turns them into a one-click evidence pack when an auditor or plan manager asks.
The core promise: audit-ready evidence in sixty seconds. Pick a participant, pick a date, pick a Practice Standard → seven-section PDF. See Audit Evidence.
Who it's for
- SIL providers (registered or unregistered) preparing for the 1 July 2026 NDIS reforms.
- Owner-operators running 1–20 workers.
- Plan managers and OTs who connect via Clearline Connect.
What Aura OS is NOT
A short list of things people ask about. If any of these is your primary need, Aura isn't the right tool — we'll happily point you at one that is.
- Not a rostering tool. Shift logging happens here, but roster planning (who's working next fortnight) belongs in ShiftCare, Deputy, or similar.
- Not a CRM. Customer-relationship tracking, sales pipelines, leads — all out of scope.
- Not a clinical record system. Clinical observations can be logged as progress notes, but full clinical records (pathology, imaging, allied-health notes) aren't Aura's remit.
- Not a general healthcare platform. SIL-specific by design. Aged care, mental health standalone, allied-health solo practice — not the target.
- Not a participant-facing tool. That's Compass, a separate free app for families and carers.
- Not a payroll system. Aura flags Fair Work SCHADS breaches but doesn't file Single Touch Payroll. Pair with Xero, MYOB or Employment Hero for pay runs.
What it costs
Aura OS is free for your first two participants — the full app, every feature, no time limit and no card required. Beyond two participants, simple caseload bands keep it affordable as you grow:
| Caseload | Price (AUD, ex GST) |
|---|---|
| Your first 2 participants | Free |
| 3–10 participants | $290/month |
| 11–30 participants | $690/month |
| 31–60 participants | $1,200/month |
| 60+ participants | Custom — talk to us |
The full feature set — shifts, handovers, the Journal, MAR, incidents, Audit Evidence packs, Webster pack OCR, invoice PDFs and PACE CSV export, Xero, and Connect messaging — is included at every band. There's no separate tier to unlock.
The bands track participants, never your team size. Adding a support worker, a family member, a Support Coordinator or an OT is always free — you only ever pay against the number of participants you support. Compass (for families), Scrive (for clinicians) and Pilot (for Support Coordinators) are free, always.
An optional Intelligence add-on is available from +$200/month for providers who want the deeper analytics layer.
Billing + migration
- Free migration, always — we move your existing records across at no cost when you join.
- Payment methods: Visa / Mastercard / Amex, or BECS Direct Debit (lower fees, recommended for Australian providers). Both options appear at checkout once you pass two participants.
- Cancel anytime from the Stripe customer portal linked in Settings → Plan. No cancellation fee. Drop back under two participants and you're free again — your data stays either way.
- All prices are AUD, ex GST. Questions? Email hello@clearlinehealth.com.au.
Sign up for an account
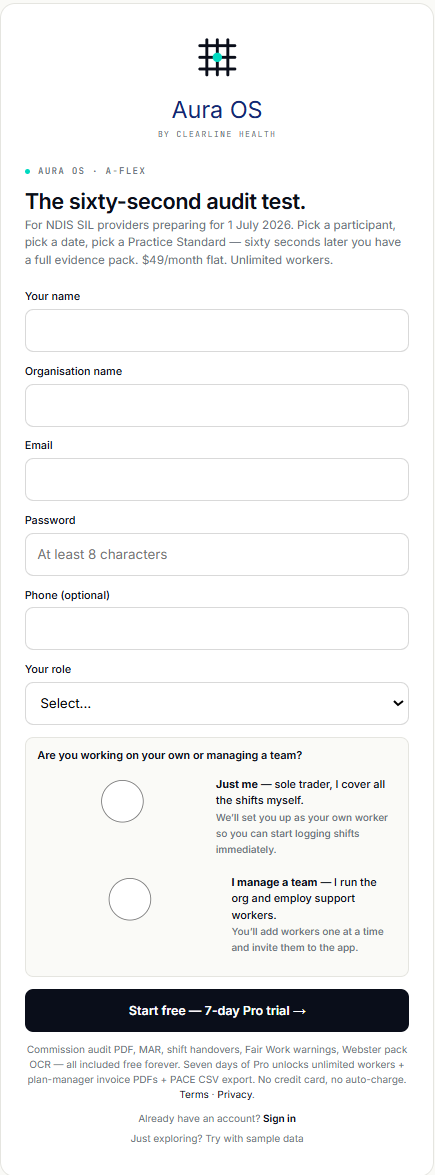
Visit clearlinehealth.com.au/aura-os. The signup form asks for:
- Your name
- Organisation name
- Email address
- Password (minimum 8 characters)
- Phone number (optional)
- Your role — Owner, House Manager, Compliance Officer, etc.
- Operating mode — "Just me" (sole trader, covers own shifts) or "I manage a team". See Solo vs team mode.
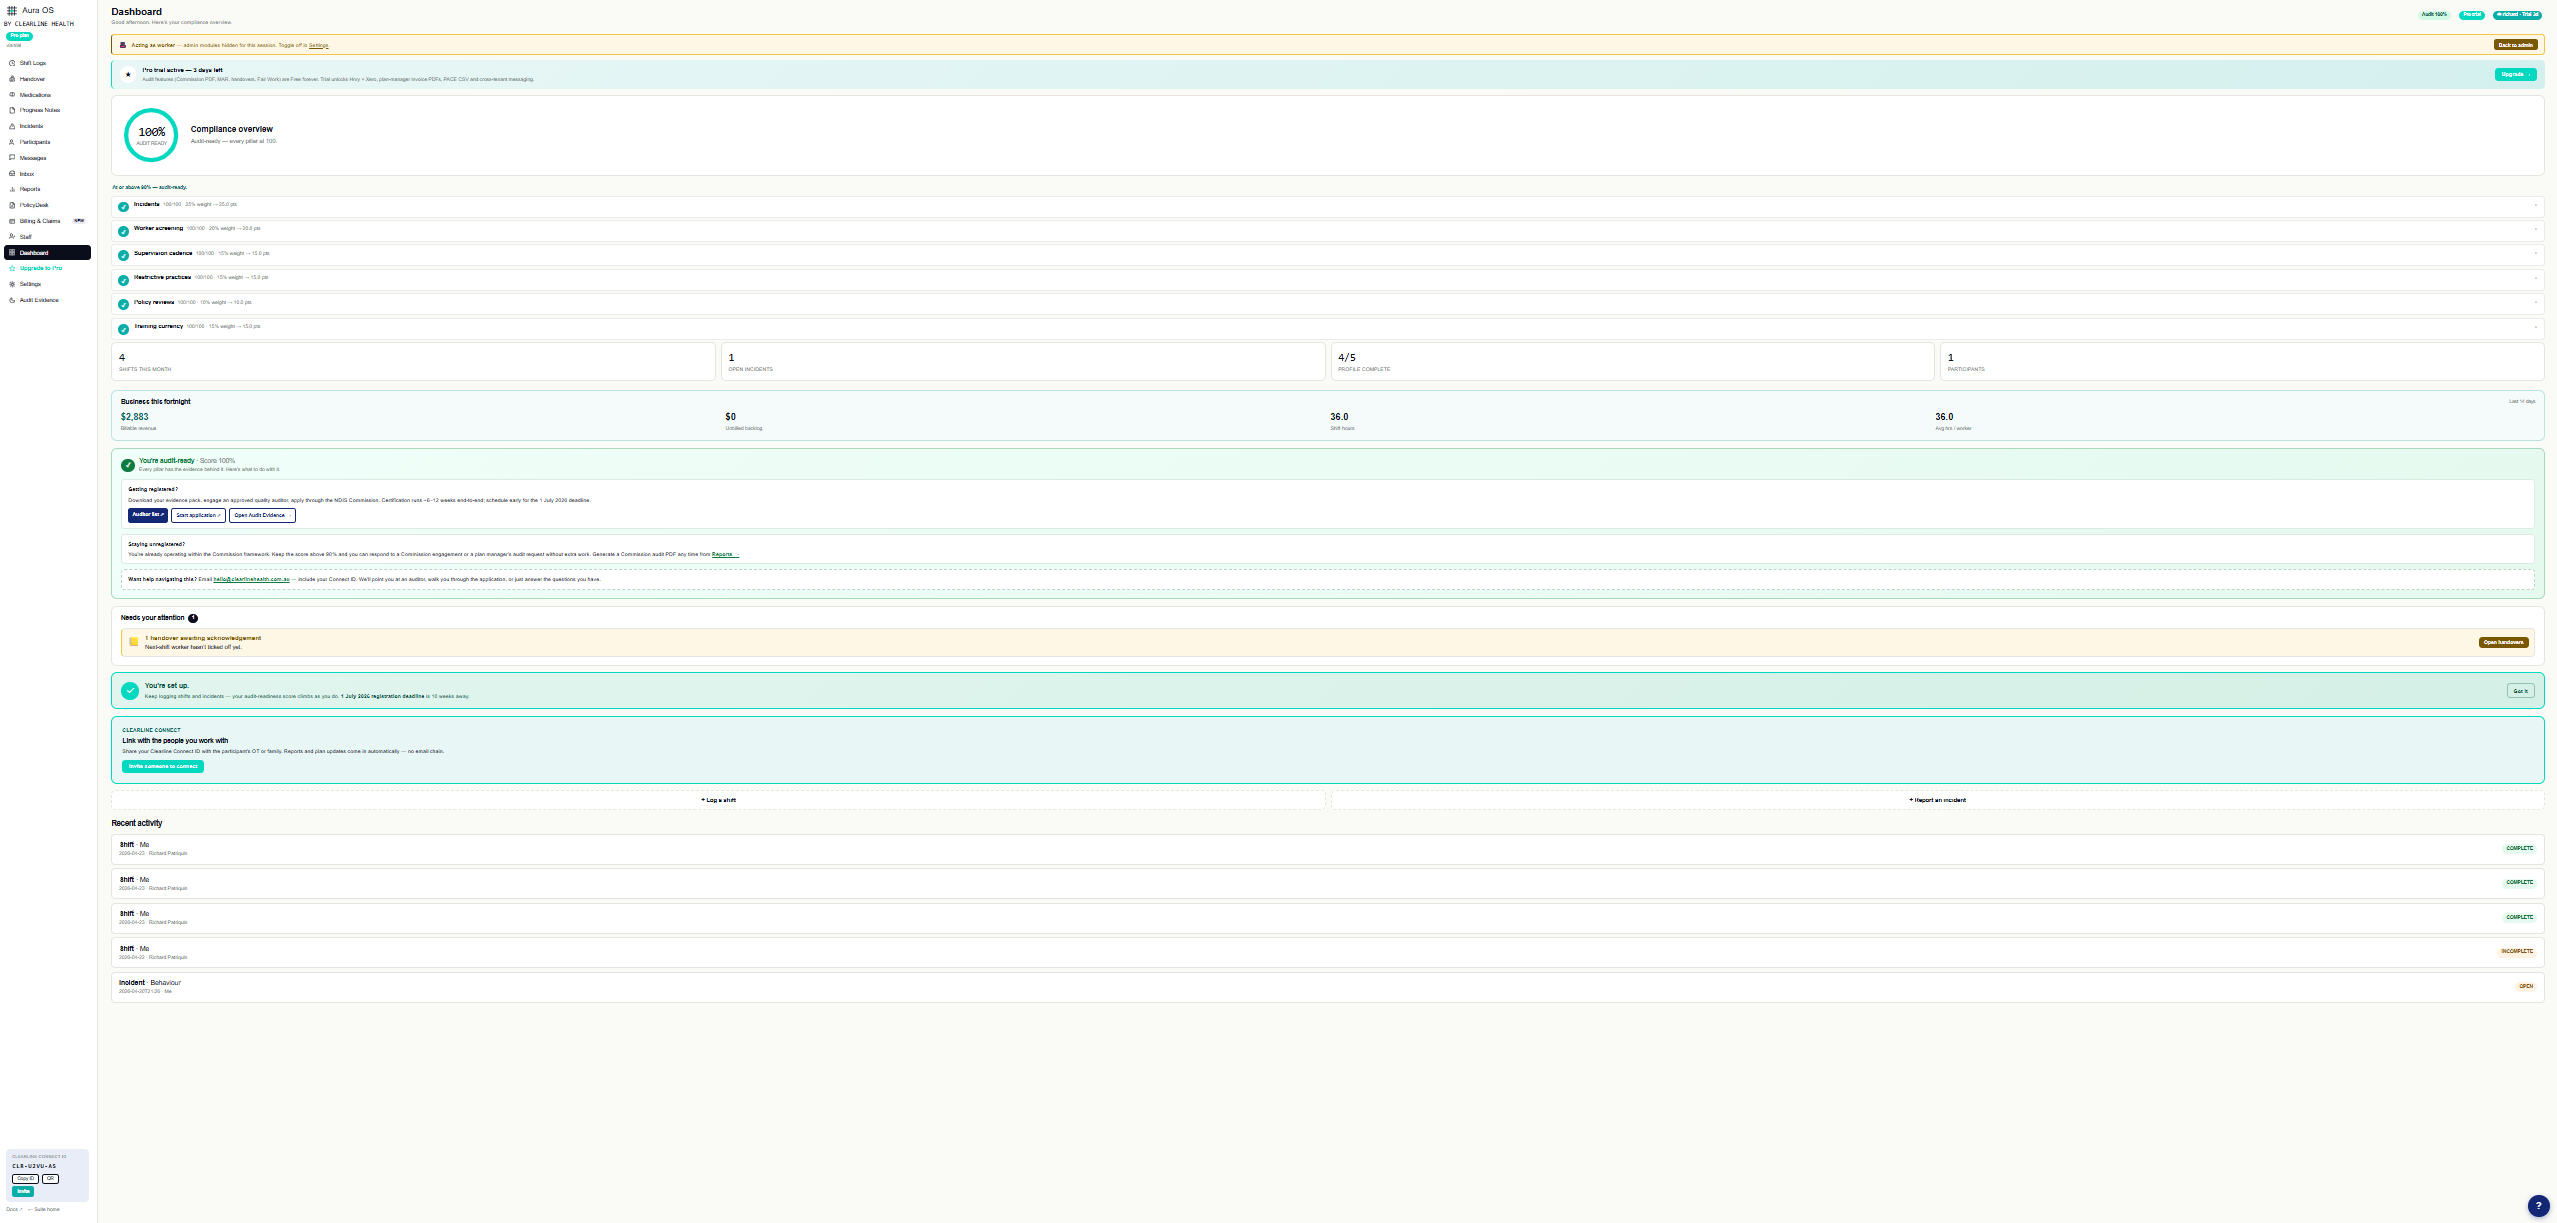
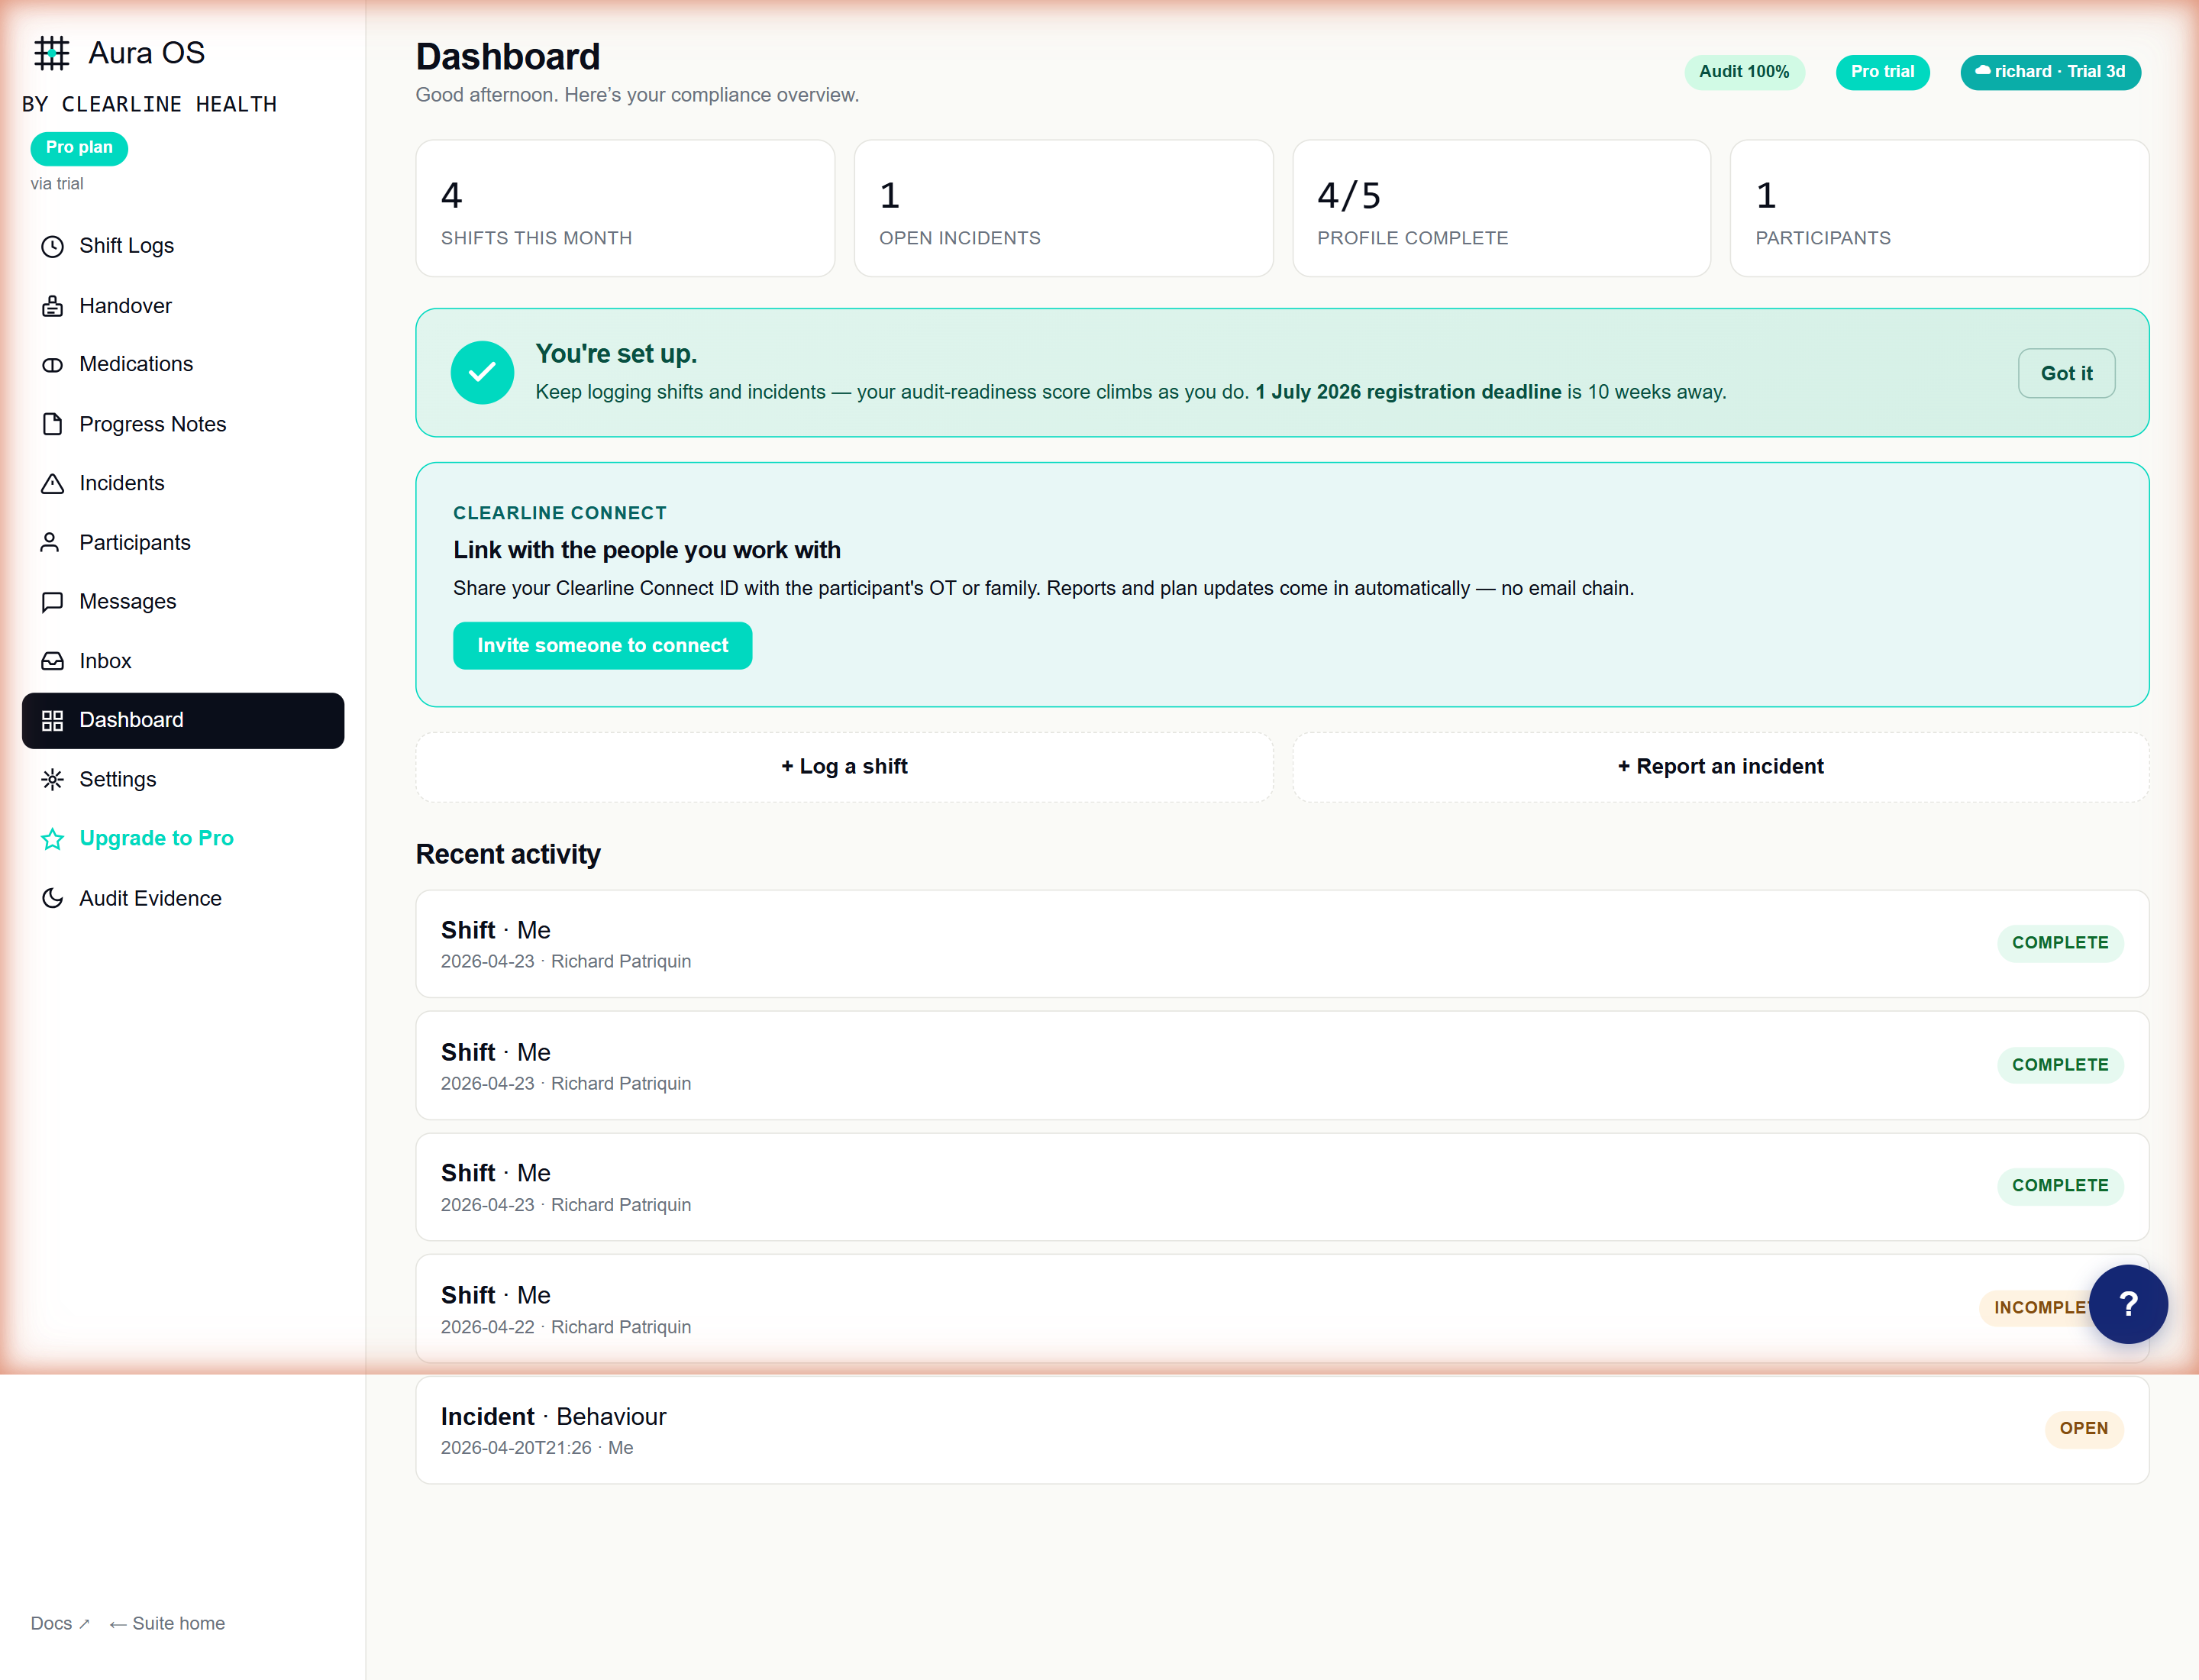
Your first login
After signing up, you'll land on the Dashboard. The Finish setup card walks you through the first 4 (team) or 5 (solo) tasks that unlock your compliance score:
- Review a policy in PolicyDesk
- Add your first worker (team) or complete your worker profile (solo)
- Add your first participant
- Log your first shift
- Log a supervision session (solo only)
Add your first participant
Go to Participants in the sidebar, then click + Add participant. The form opens with six essential fields visible and five collapsible sections for optional detail. You only need to fill what you know now — edit the rest later.
Essential fields
- First name (required)
- Date of birth
- Primary disability
- NDIS classification (Standard, Improved Liveability, Fully Accessible, Robust, HPS)
- Aboriginal or Torres Strait Islander status (required — NDIS reporting)
- Language spoken at home (required)
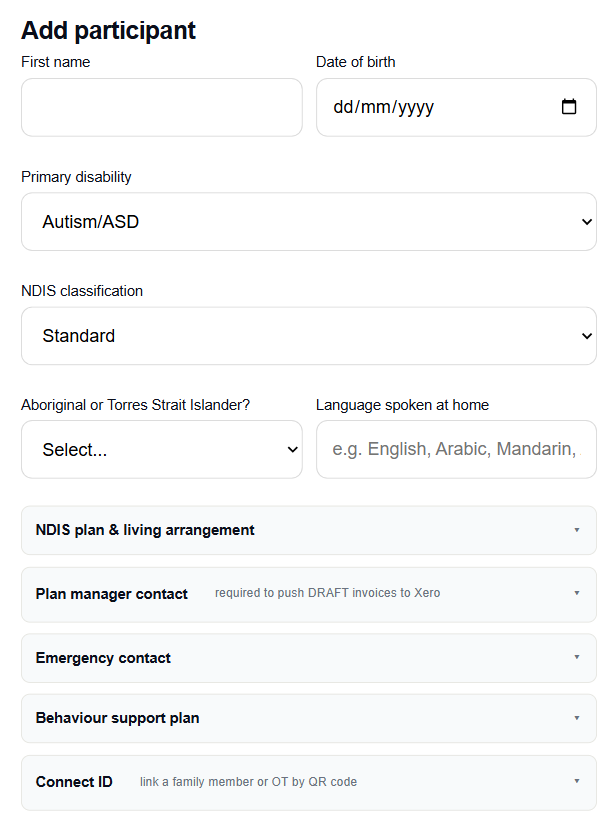
Collapsible sections
- NDIS plan & living arrangement — NDIS number, plan start/end dates, living arrangement (SIL shared, SIL individual, etc.)
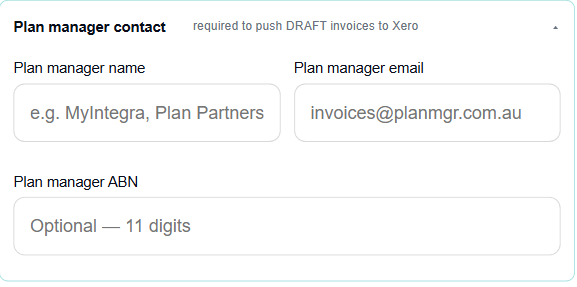
- Plan manager contact — name, email, ABN. Needed to push DRAFT invoices to a connected Xero tenant. See Xero integration.
- Emergency contact — name, phone, email.
- Behaviour support plan — toggle active + triggers/de-escalation notes (encrypted at rest).
- Invite the family — email-invite the family to Compass directly from the participant record. See Clearline Connect.
Bulk import via CSV
If you're onboarding many participants at once, use the Import CSV button at the top of the Participants list. See Bulk CSV import for the full walkthrough.
Invite support workers
Applies to team mode only. Skip this section if you're on solo mode — your worker record was created automatically on signup.
You can invite workers from three places:
- Staff → + Add worker. Fill in name, role, employment details + email, keep "Send sign-in link" ticked. Creates the worker record, sends the invite.
- Settings → Team → Invite by email. Creates only the invite; the worker record is created on accept.
- Participants → participant card → Assign workers. Handy if you just added a participant and want to give an existing worker access.

How workers sign in
Workers don't set a password. They click the emailed sign-in link, which opens Aura OS logged in. On subsequent visits they use Email me a sign-in link on the login screen.
Assigning workers to participants
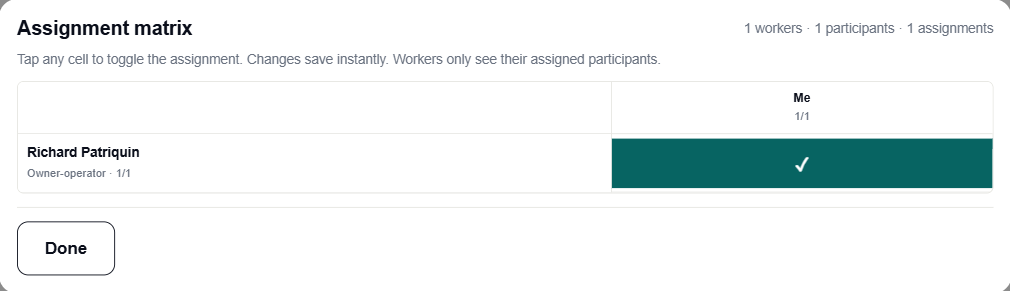
Workers only see the participants they've been explicitly assigned to. The fastest way to set this up is the assignment matrix:
Settings → Team → Assignment matrix shows workers × participants as a grid. Tap any cell to toggle the assignment. Changes save instantly.
Log your first shift
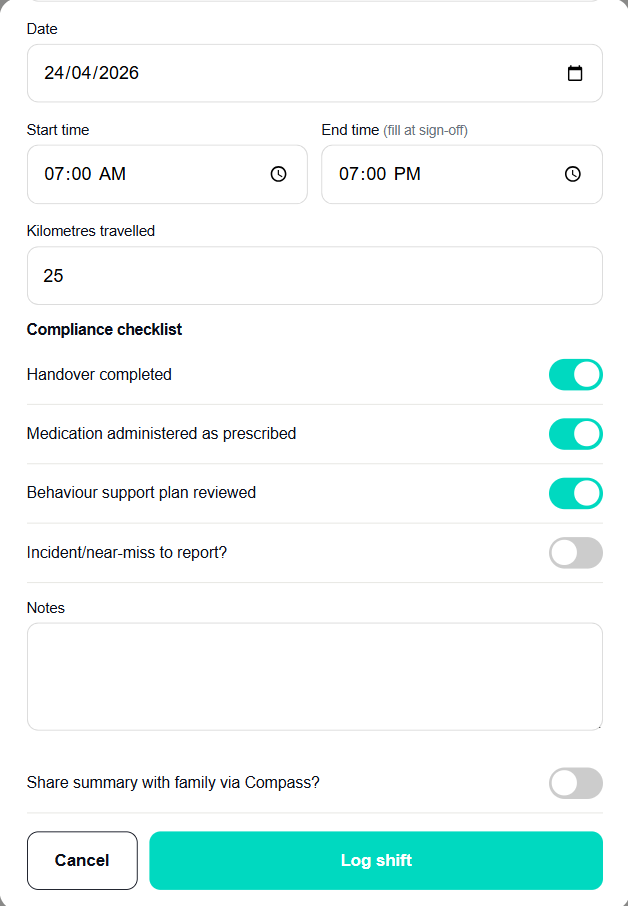
Open the Shift logs module. Admins click + New shift; workers click ⚡ Start shift now which pre-fills today's date, the current time, and the worker.
Required fields
- Participant
- Support worker
- Date + start + end time
- Five end-of-shift checks: Handover completed, No incidents, Medications given (if applicable), Notes completed, BSP followed (if applicable)
- Wellbeing acknowledgement — ticking "I have sighted the participant and confirmed their wellbeing" unlocks sign-off
Check-in, check-out, sign-off
- Check-in (optional) — on arrival, stamps the time + GPS coordinates. Native geo on the Android wrap; browser geo elsewhere.
- Check-out (optional) — on departure, stamps departure time + GPS.
- Sign-off — end of shift, when all five checks pass. Triggers:
- An auto-billing row (when the participant has a default service assignment)
- Audit log entry
- The shift becomes read-only for non-admins
Generate your first invoice
Requires at least one signed-off shift with an auto-billing row.
Open Billing & Claims. The Generate new batch card at the top takes a date range + a format:
- Invoice PDF (plan manager) — for invoicing plan-managed participants.
- PACE CSV (registered provider) — for registered providers lodging direct with the NDIA.
Pick a range using the presets (This fortnight / Last 28 days / Last month) or set custom dates. Click Generate. A 5-minute presigned download link opens in a new tab.

See Billing & claims for the full workflow (Xero push, send to plan managers, batch history).
Participants
The Participants module is where you add, edit, archive, and assign the people you support.
Add & edit
Covered in Add your first participant. To edit an existing participant, click their name in the list then Edit.
Archive
Click the participant card → Archive. Archived participants stop counting toward your billable participant count but their shift history stays in the audit log. Restore from the Archived tab.
Assign workers
Two entry points:
- Participant card → Assign workers — tick the workers who support this person.
- Settings → Team → Assignment matrix — grid view of the whole team.
Assignments are what drives worker scope: a worker only sees the participants they're assigned to, in every module.
Invite the family
Each participant record has an Invite the family section (always-visible inside the participant modal). Enter the family's email, add an optional personal message, send. The family receives a Compass sign-up link; once they sign up and add the participant's NDIS number to their plan, the link materialises automatically and appears as a pending approval in your Aura Care team panel.
Build the care team in one screen
Right after you add a participant, Aura offers the care-team builder: family email (prefilled from the emergency contact where it's an email), Support Coordinator email, and OT/Behaviour Support email — one send, three invites. The OT row records the participant's consent basis (verbal / written / form on file / representative authority) before anything is sent. Skip it any time; every invite path remains available individually.
How the email invite flow works
What happens after you send the email invite:
- Family receives an email from
hello@clearlinehealth.com.auwith a Accept this invitation button. - Clicking opens Compass with an inviter-context banner (your org name, participant name, your personal message).
- Family signs in — or signs up via standard magic-link signup if they're new (the invitation context survives either way).
- Clicking the email and signing in IS the family's acceptance — the link goes active automatically, no separate approval tap. If their plan doesn't yet carry the participant's NDIS number, Compass prompts them to add it and the link completes the moment it's saved.
- Either side can revoke the link at any time.
Below the invite section you'll see Pending email invitations for this participant — a panel showing every active email invite you've sent, with the recipient address, who sent it (you or a colleague at your org), and dates. Each row has a Cancel button.
Invitations expire automatically after 7 days. Cancel any time before redemption from the panel; the family's email link stops working immediately. The personal message field is visible to anyone with the invitation link — keep it short and avoid sensitive details (medical, financial, plan numbers).
For the full end-to-end story of how data flows after the link is active, see Connect documentation.
Shifts & handovers
Shifts are the spine of Aura OS — they drive the compliance score, feed auto-billing, and generate the handover chain that the next worker reads before they start.
Shift statuses
| Status | Means |
|---|---|
| In progress | Checked in but not signed off. Blocks the next shift's Handover from being finalised. |
| Signed off — complete | All 5 checks passed. Read-only for non-admins. Auto-billing row created. |
| Signed off — flagged | One or more checks = No. Admin can review and unflag after resolution. |
Handover notes
A handover note is what the outgoing worker writes at sign-off. The incoming worker reads it on the Handover screen before they start. The NDIS expects every handover to be acknowledged on the next shift — the Handovers module tracks this.
Written for you, from the Journal. If the worker has written Journal entries during the shift, sign-off drafts the handover note and the shift notes from those entries automatically — capture once, no double handling. Anything the worker typed by hand always wins; the AI never overwrites it and never invents detail that isn't in the entries.
/docs/screenshots/handover-overview.png.Pending handovers show up as amber on the dashboard "Needs your attention" row (admin view).
Editing a past shift
Admins can edit any shift; managers can edit shifts on participants they manage; workers can edit their own shifts until sign-off. After sign-off, only admins can correct.
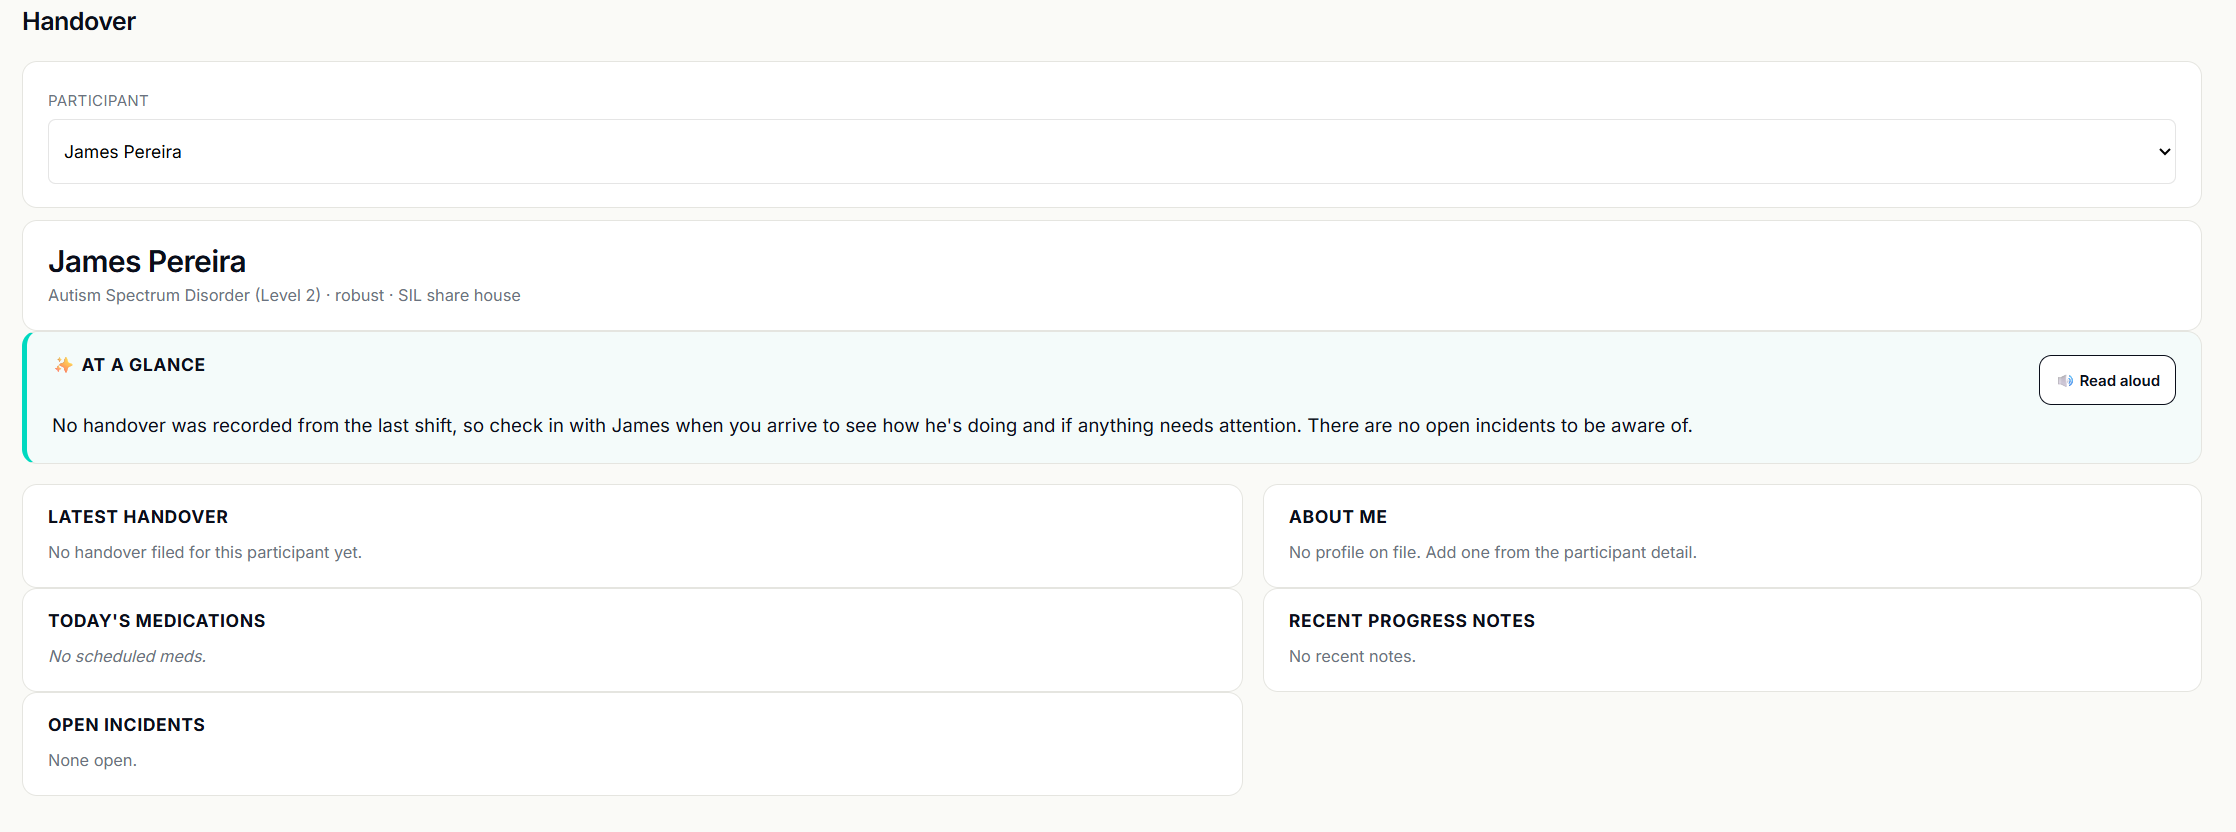
Handover
The worker's first-screen-of-the-day. Handover notes from the previous shift, medications due this shift, open incidents, and the participant's behaviour support notes — all on one screen.
The whole care team lands here. When the participant's network is connected via Clearline Connect, the Handover opens with up to three extra cards, in this order:
- Behaviour support strategies — published by the participant's Behaviour Support Practitioner from a shared BSP (Scrive): triggers, proactive and reactive strategies, and practices that must not be used — in the practitioner's own words.
- About them — from the family — the family's own About Me from Compass: how they communicate, routines, what helps when upset, what a good day looks like. Updates live as the family edits it.
- What we're working toward — the participant's current plan goals, published by their Support Coordinator from Pilot, with a nudge to journal against them.
Each card appears only while the relevant Connect link is live — revoke the link and it vanishes from the brief.
House mode — shared SIL homes
Most shared SIL homes run 1:2 or 1:3 support ratios — one worker, several residents. Give each participant a House / site label on their profile and Aura groups them: the Handover screen lists your houses with one-tap entry into each resident's brief, and inside a brief an "Also at [house]" strip lets the worker move between housemates without leaving the screen. In the Journal, an entry can apply to several residents at once — each gets their own independent entry on their own record (records never merge; only the screen does).
Open from the sidebar Handover, or tap Open Handover for this participant first → inside the Log Shift modal.
Medication administration (MAR)
The Medication Administration Record tracks scheduled + PRN medications, with S4 / S8 controlled-schedule support and witness capture for S8.
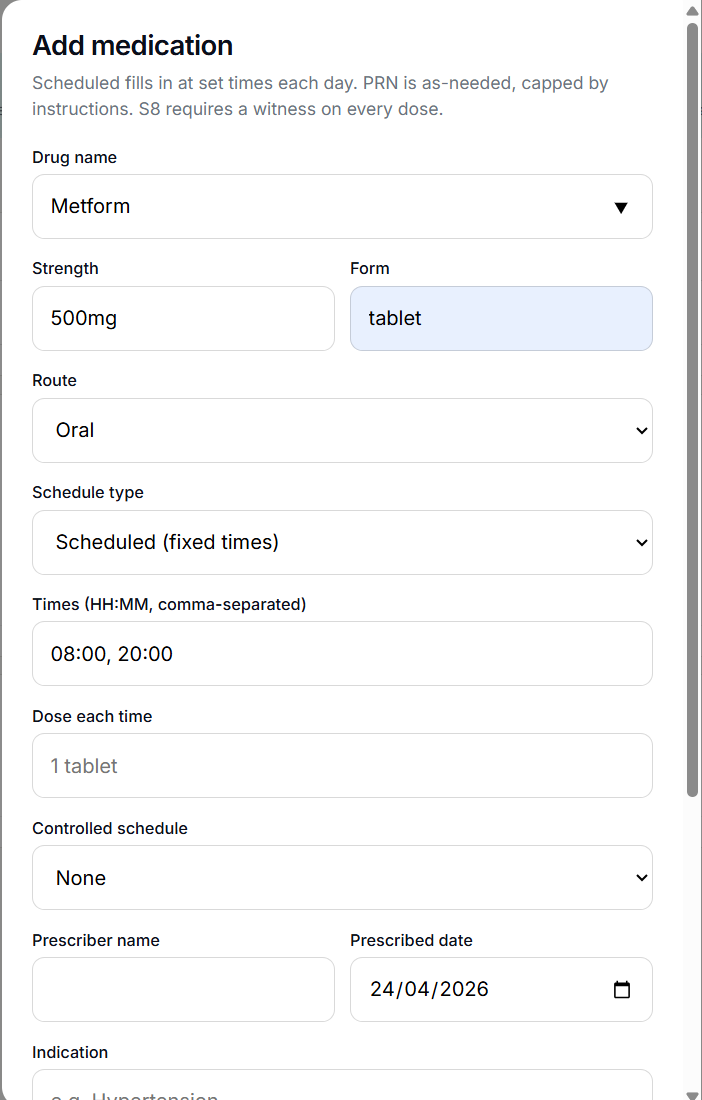
Add a medication
Open Medications, pick the participant, click + Add medication. Fill:
- Drug name, strength, form (tablet, liquid, patch, etc.), route (oral, sublingual, IV, topical, etc.)
- Schedule type — Scheduled (fixed times, e.g. 08:00 / 20:00) or PRN (as-needed with instructions + max-doses cap)
- Controlled schedule — None / S4 / S8. S8 auto-ticks "witness required" — every dose will prompt for a second worker to witness.
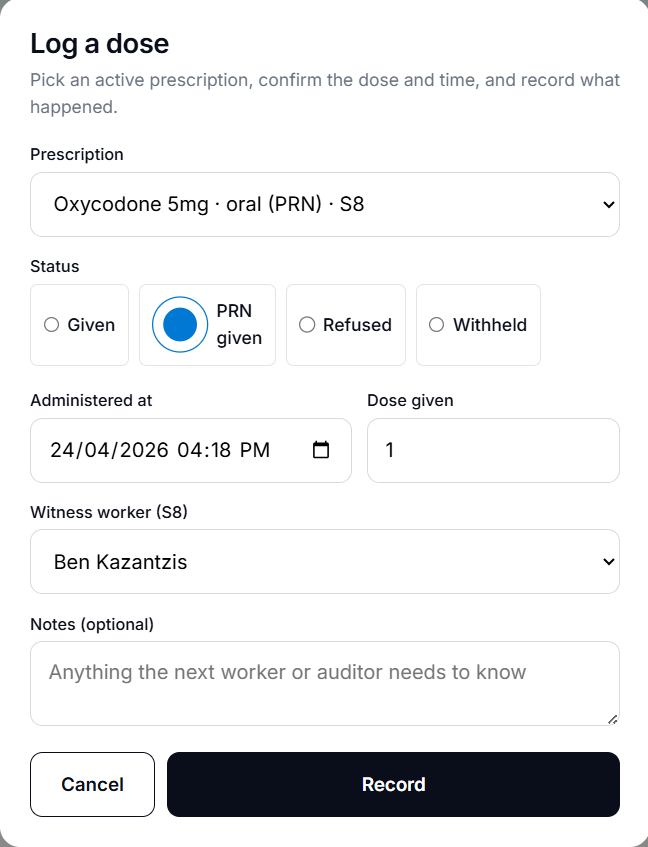
Log a dose
On the MAR module, each due dose appears in the Due list. Click Record dose:
- Administered-at time (defaults to now, and remembers your last-used time for batch-logging missed doses)
- Outcome — Given / Refused / Omitted / Vomited (with mandatory reason for anything non-Given)
- Witness worker (S8 only — the dropdown appears when controlled=s8)
- Notes (optional)
Low-quantity alert
When the remaining quantity of a scheduled medication drops under 7 days, an alert appears on the Dashboard. Admin only.
Journal
The Journal (formerly Progress notes) is where workers capture the day as it happens — short entries on each participant, written during or straight after the shift. Entries written while a shift is open attach themselves to that shift automatically; backdated entries attach by date.
Capture once, everything else writes itself. At shift sign-off, the Journal entries for that shift are summarised into the handover note and the shift notes automatically — workers stop writing the same thing three times. Hand-typed notes always take precedence, and the AI never invents anything that isn't in the entries.
Journal entries are also the evidence backbone of the network: with the provider's per-scope approval they feed a Behaviour Support Practitioner's assessment evidence (Scrive) and the family's end-of-day digest (Compass) — see Clearline Connect.
Their words, not just yours. Tick "These are the participant's own words" when an entry is the person's own voice, captured with your help. The flag travels with the entry — the family digest can quote them, and their voice reaches plan-review evidence as theirs.
Used for NDIS reporting + plan reviews. Workers can add entries on participants they're assigned to; admins see all.

Incidents
Incidents are anything that triggers an NDIS Commission reportable-incident review: medication errors, serious injury, use of restrictive practice, neglect, abuse, unexplained death. Aura guides you through the five-step Commission investigation framework on resolve.
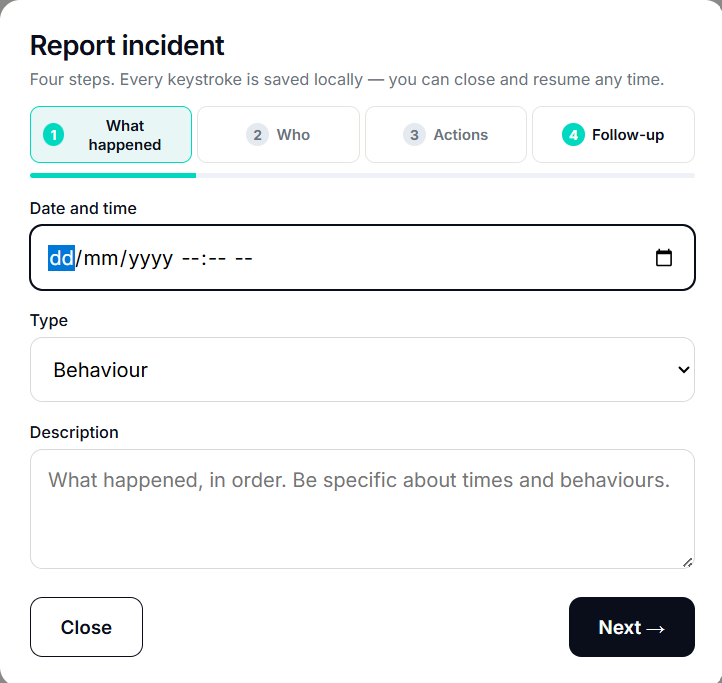
Report an incident
Quick-action + Report an incident from the Dashboard or FAB. Fill:
- Participant, date, time, location
- Type (medication error, injury, restrictive practice, etc.)
- What happened, immediate actions taken, who was notified
Resolve an incident
Open the incident → Resolve. The stepper walks you through five Commission-aligned prompts:
- CCTV or location footage reviewed?
- Staff on shift interviewed?
- Family / guardian contacted?
- NDIS Commission notified (if reportable)?
- Prevention actions taken?
Each prompt is a yes/no radio + a detail textarea. Answering auto-advances to the next unanswered prompt — you can blast through all five on a phone without scrolling.
Audit Evidence
The sixty-second audit test. Pick a participant, a date, a Practice Standard → get a seven-section evidence pack you can hand straight to an auditor or plan manager.
How to generate a pack
- Open Audit Evidence in the sidebar.
- Pick a participant (defaults to whoever had the most recent shift).
- Pick a date you want audited.
- Pick a Practice Standard — SIL-specific, Rights & Responsibilities, Governance, Provider Governance, Support Provision, etc.
- Click Generate pack.

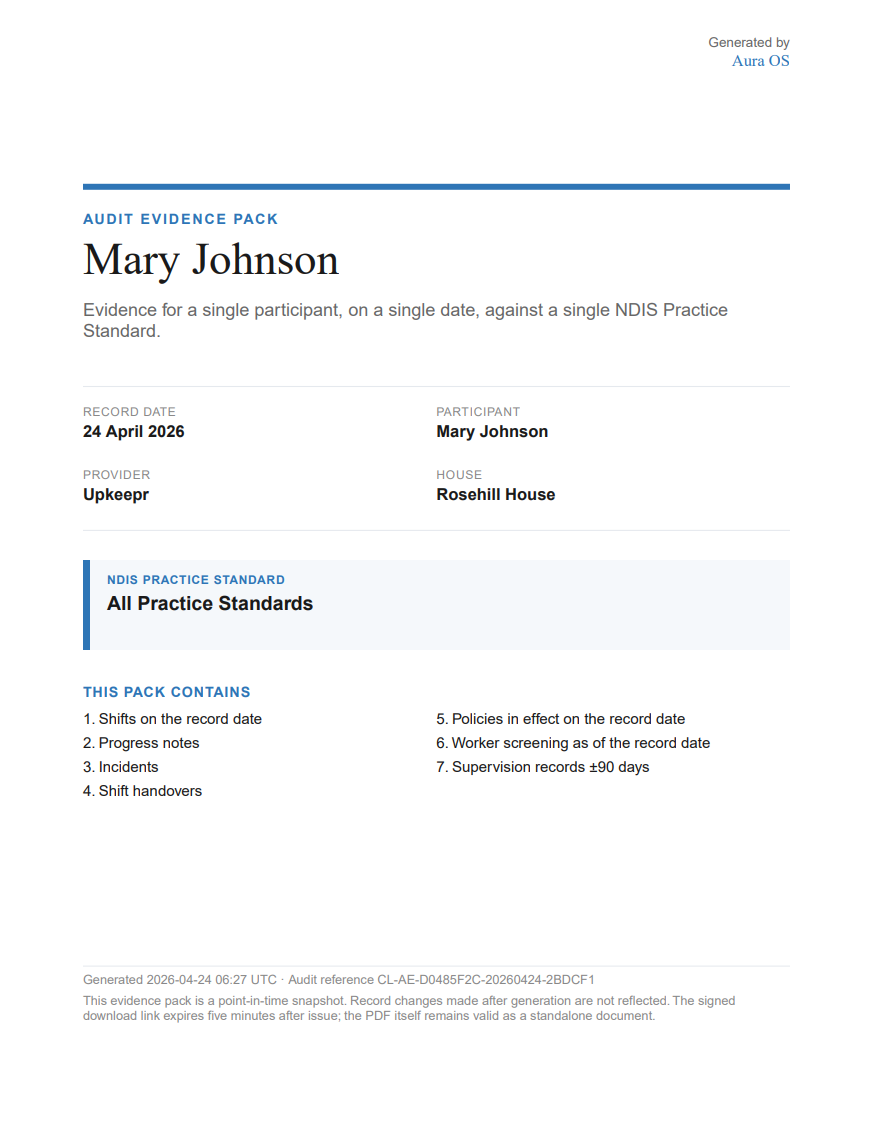
What's in the pack
Seven sections, rendered as a branded PDF:
- Cover — your org, compliance score, date range.
- Participant profile — demographics, NDIS plan, primary supports.
- Shift log for the date — check-in/out times, worker, GPS, 5-check outcomes, handover written and acknowledged.
- Medication record — every dose logged that day, with S4/S8 witness trails.
- Incidents — any open or resolved incident affecting the participant.
- Policy evidence — the specific policies the selected Practice Standard requires, with last-reviewed dates.
- Worker credentials — NDIS Worker Screening, mandatory training expiries for the worker who was on shift.
Email to auditor
After generation, click Email to auditor. The pack is delivered via Resend with a short cover note and the PDF attached. The recipient doesn't need a Clearline account.
Billing & claims
Invoice plan managers or lodge with NDIA direct. Aura aggregates every signed-off, uncancelled shift billing in a period into one document.
Service codes
Before billing works, each participant needs a default service assignment — a mapping from their shifts to an NDIS service code (e.g. 01_011_0107_1_1 for standard weekday support). Set this up in Billing & Claims → Participant assignments.
Generate a batch
- Pick a format: Invoice PDF (plan manager) or PACE CSV (registered provider lodging direct).
- Pick a date range (use the presets for speed).
- Click Generate.
The resulting PDF or CSV opens in a new tab with a 5-minute presigned download URL. A batch record is saved; you can re-download it from the Batches tab.
/docs/screenshots/billing-generate-form.png.Xero skip warning
If your org is connected to Xero and you pick Invoice PDF, Aura runs a pre-check before generating. If any participant in the period lacks a plan-manager contact on their profile, a confirm dialog lists them by name and explains:
"3 of 5 participants in this batch have no plan manager. They'll appear in the invoice PDF but WILL NOT push to Xero as DRAFT invoices…"
Cancel to add plan-manager contacts, or OK to generate anyway (PDF covers everyone; Xero push only covers the ones with a plan manager).
/docs/screenshots/billing-xero-skip-dialog.png.Send to plan managers
On any invoice batch in the Batches tab, click Send to plan managers. Aura emails each participant's plan manager with the invoice PDF attached. Skipped recipients (no plan-manager email on file) are reported in the toast.
Click View sends to see delivery status per recipient (delivered / bounced / queued).
Batch history
Every generated batch is logged with its period, row count, total value, and current status. Re-download the PDF or CSV at any time (a fresh 5-minute presigned URL is minted).
Xero integration
One-way push: every invoice batch you generate also creates DRAFT invoices in your Xero tenant, one per participant. Review and authorise in Xero as you would any DRAFT.
Connect your Xero account
- Go to Settings → Xero integration.
- Click Connect Xero. You'll be redirected to Xero.
- Authorise Aura OS against the Xero organisation you want to use.
- You'll be redirected back to Settings with a "Xero connected" toast and the tenant name in the Xero card.
/docs/screenshots/settings-xero-connected.png.What gets pushed
- One DRAFT invoice per participant per batch.
- Invoice number format:
CL-INV-<batch-id>-<sequence>-P<participant-index>. - Contact = the participant's plan manager (name + email + ABN on the participant record).
- Line items mirror the invoice PDF.
- Reference: "Aura OS batch <batch-id-prefix> · <participant name>".
Participants skipped from Xero
A participant is included in the invoice PDF but not in the Xero push if they have no plan-manager name and no plan-manager email on their profile. Fix: open the participant, expand the Plan manager contact section, fill in at least one of name or email.
Disconnecting
Settings → Xero integration → Disconnect. Future batches stop pushing until you reconnect. Existing Xero invoices are untouched.
Funding Integrity
Funding Integrity reconciles the support you've delivered (completed, signed-off shifts) against what you've claimed, and surfaces the gaps both ways: support delivered but not yet claimed (under-claims you may still be able to recover), and claims with no matching delivered shift (possible over-claims to check before your next run). Admin-only.
- Open Funding Integrity in the sidebar.
- Pick a From and To date and hit Reconcile period.
- Review each finding — it shows the participant, what looks off, and (where it can) an estimated dollar figure. Mark each one Reviewed, Actioned, or Dismissed.
Clearline Connect
Clearline Connect is the cross-product invite + consent layer. Aura OS uses it to link with Compass families and Pilot Support Coordinators by email, and with Scrive OTs via a short Connect ID. Once linked, you can exchange messages, share reports, and push plan updates without email chains.
Linking with a family (Compass)
From the participant record → Invite the family section: enter the family's email, optional personal message, send. The family clicks the email and signs in (or signs up) — that acceptance activates the link automatically once the participant's NDIS number is on their plan. See Invite the family above for the full walkthrough.
What flows to whom — scope approvals you control
Connections never open the data tap by themselves. In the Connect hub, each linked practice or family carries a Scopes button where your admins decide, item by item:
- Family links (Compass) — Daily digest for the family: a short, family-friendly end-of-day summary written from worker Journal entries. Incidents never appear in detail — only a fixed "the team will be in touch" line. Off until you approve it.
- Behaviour-support links (Scrive) — Incident summaries (counts by type, severity and time of day — no narrative) and Journal excerpts, used as functional behaviour assessment evidence. Each read the practice makes lands in your Activity log.
Linking with a Support Coordinator (Pilot)
From Settings → Pilot Connect → + Invite SC: pick the participant, enter the SC's email, tick the scopes you want to grant (shifts, incidents, training, etc.), send. The SC receives an email with a sign-up link to Pilot and accepts the scopes from their Pilot dashboard.
Linking with an OT (Scrive)
Scrive currently links via a Connect ID (format CLR-XXXX-XX) — an OT shares theirs from Scrive Settings; you import it via the sidebar + Send an invitation → Invite an OT or clinician. We accept this is the legacy path while we modernise the Scrive direction toward an email-invite flow.
How invitations show up
Outgoing email invitations land in Pending email invitations for this participant under the participant record. Incoming requests from Compass families show up under Settings → Family connections from Compass. SC requests show up under Settings → Connect requests from Support Coordinators. All three surfaces support Approve / Decline / Revoke and audit-log every action.
Webster pack OCR
Photograph a Webster pack label → Claude vision reads it → medication rows are pre-filled for your review before they save.
How to use it
- Open Medications → pick a participant → click 📷 From photo.
- Your camera opens (mobile). Take a clear photo of the Webster pack label.
- Wait 5–10 seconds for Claude to extract the medications.
- Review each row — drug, strength, schedule, confidence chip, raw label quote. Edit any row that looks wrong, or tap Skip to drop it.
- Click Save selected. Saved rows become real medications on the MAR.
/docs/screenshots/webster-review.png.Push notifications
Aura sends push notifications to your Pixel, Samsung, or iPhone when you install the native wrap (Android available on Richard's Pixel 9 Fold today, Play Console publish pending; iOS on the roadmap).
What triggers a push
- New Connect message from a family member or OT (coming soon — care-team chat is being wired into the app)
- Incident reported on a participant you're assigned to
- Shift handover filed for the shift starting within the hour
- Due medication reminder (MAR, 10 minutes before dose time)
You can opt-out per category in Settings → Notifications.
Roles & permissions
Aura has four roles. The role is set when an invite is sent and can be changed from Settings → Team.
| Role | Access |
|---|---|
| Admin | Full control. The org owner is always an admin. Only admins can change billing, invite workers, disconnect Xero, export audit logs. |
| Manager | Mid-tier admin. Rosters shifts, approves onboarding, reviews incidents. Can't change plan or invite admins. |
| Worker | Support worker. Sees only the participants they're assigned to. Logs their own shifts, handovers, notes, meds. Can't see org-wide compliance, peer shifts, or admin-only modules. |
| Member | Legacy read-only. Rarely used. |
What workers don't see
- Dashboard compliance score ring + six-pillar breakdown (org-wide data).
- Staff module — they see their own profile instead, under "Your worker profile".
- PolicyDesk, Reports, Billing & Claims, Settings → Team.
- Clearances or training expiries of peers.
"Acting as worker" toggle (admin only)
Admins can temporarily switch to a worker-only view to test what their workers see. Settings → Multi-hat card → Act as worker. The banner at the top of every page reminds you you're in worker view. Clear via the banner's Back to admin button or by signing out.
Solo vs team mode
Picked at signup. Changes how Aura branches:
| Solo | Team | |
|---|---|---|
| Auto-worker on signup | Yes — you're created as your own worker immediately | No — you invite workers yourself |
| "Invite workers" UI | Hidden | Visible |
| Assignment matrix | Hidden | Visible |
| Setup checklist | 5 steps (incl. supervision) | 4 steps |
| Shift Log default | You + your only participant auto-picked | Pickers empty, you choose |
| Dashboard title | "Your worker profile" | "Staff" |
Switching modes
Settings → Operating mode card. Solo → team always works. Team → solo requires exactly one worker linked to the current admin (so Aura knows who the sole trader is); otherwise you get a "cannot switch — you have more than one worker" warning.
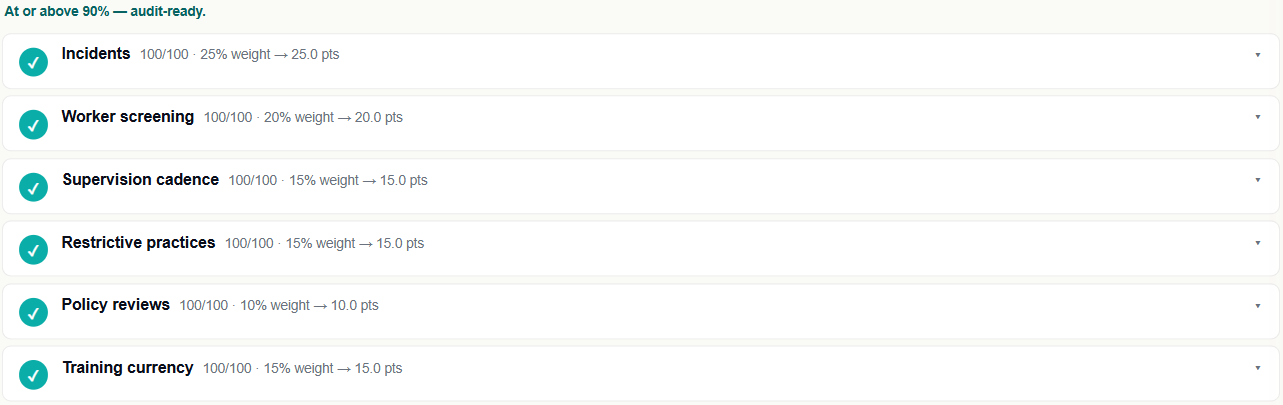
Compliance score
An overall 0–100 score plus six weighted pillars. Visible on the Dashboard (admin + manager only). ≥ 90 is audit-ready.
The six pillars
Each pillar is weighted — the overall score is a weighted average of the six. Weights reflect what the NDIS Commission prioritises.
| Pillar | Weight | What it measures |
|---|---|---|
| Incidents | 25% | Rate of incident-free shifts + timely resolution of any reported incidents. |
| Worker screening | 20% | Every active worker carries a valid NDIS Worker Screening clearance. |
| Training currency | 15% | Mandatory training (first aid, CPR, manual handling, NDIS Orientation) current on every worker. |
| Supervision cadence | 15% | Supervision sessions logged per worker per quarter (NDIS 90-day cadence). |
| Restrictive practices | 15% | Behaviour support plans current, authorisations in place where required. |
| Policy reviews | 10% | 12 mandatory policies reviewed within the last 12 months. |
Where the weights come from: the bigger the direct participant-risk signal a pillar sends the Commission, the higher it's weighted. Incidents and worker screening together carry 45% because those two drive most reportable-incident + investigation cases.
Click any pillar row to drill down to the specific workers, policies, or incidents pulling the score down.
30-day delta
The score banner shows how much the number has moved in the last 30 days. Useful for steering — if you fix three policies this week, you'll see the pillar + overall score respond.
Worker compliance & onboarding
Aura turns the screening and training data you already keep into a managed onboarding + lifecycle — so you always know who can work, and a clearance never lapses unnoticed. It lives in the Staff section.
Compliance status at a glance
Every worker in the Staff list shows a status pill — Ready, Expiring, or Blocked — plus a count of items needing attention. "Blocked" means a required item is expired or missing (NDIS Worker Screening, First Aid, Police check, or WWCC).
The Onboarding & Compliance panel
Open any worker's Compliance panel to see every item with its status, expiry date + countdown, and a link to the evidence on file — screening, the mandatory certs, and the rest. (In this release the panel is read-only; worker self-service onboarding is coming.)
Expiry nudges
As a dated item approaches expiry, Aura nudges the worker and the admin at 90, 30 and 7 days before — and again if it lapses. Built for the 2026 NDIS Worker Screening renewal wave, so renewals get handled before they cost you a shift.
Roster gate (warn + override)
If you roster a worker who's compliance-blocked, Aura warns you and asks for a reason — it doesn't hard-stop you (a short-staffed house still needs cover), but the override is recorded in the audit trail with who, when, and which item. The same shape as the medication cap-override.
Feeds your audit score
Worker compliance is an NDIS Practice Standards pillar — incomplete or expired items pull your compliance score down, so the panel and the score always agree.
Not payroll. Tax / super / bank details are collected only for a clean hand-off to your payroll tool (Aura already integrates with Xero) — Aura does not run STP, SuperStream, or super processing.
PolicyDesk
34 NDIS policy templates pre-seeded — one per outcome of the 2025 Core Module the NQSC Applicant Portal asks SIL providers about, plus the Behaviour Support and HIDPA supplementary modules, plus standalone Code of Conduct, Bullying & Harassment, Conflict of Interest, Drug & Alcohol, Whistleblower and Document Control policies. You review each one, date it, and optionally attach a method note. Seven are flagged "SIL blocker" — the outcomes the NQSC most often rejects SIL applications on without strong written evidence. The Policy Reviews pillar reads from this module.
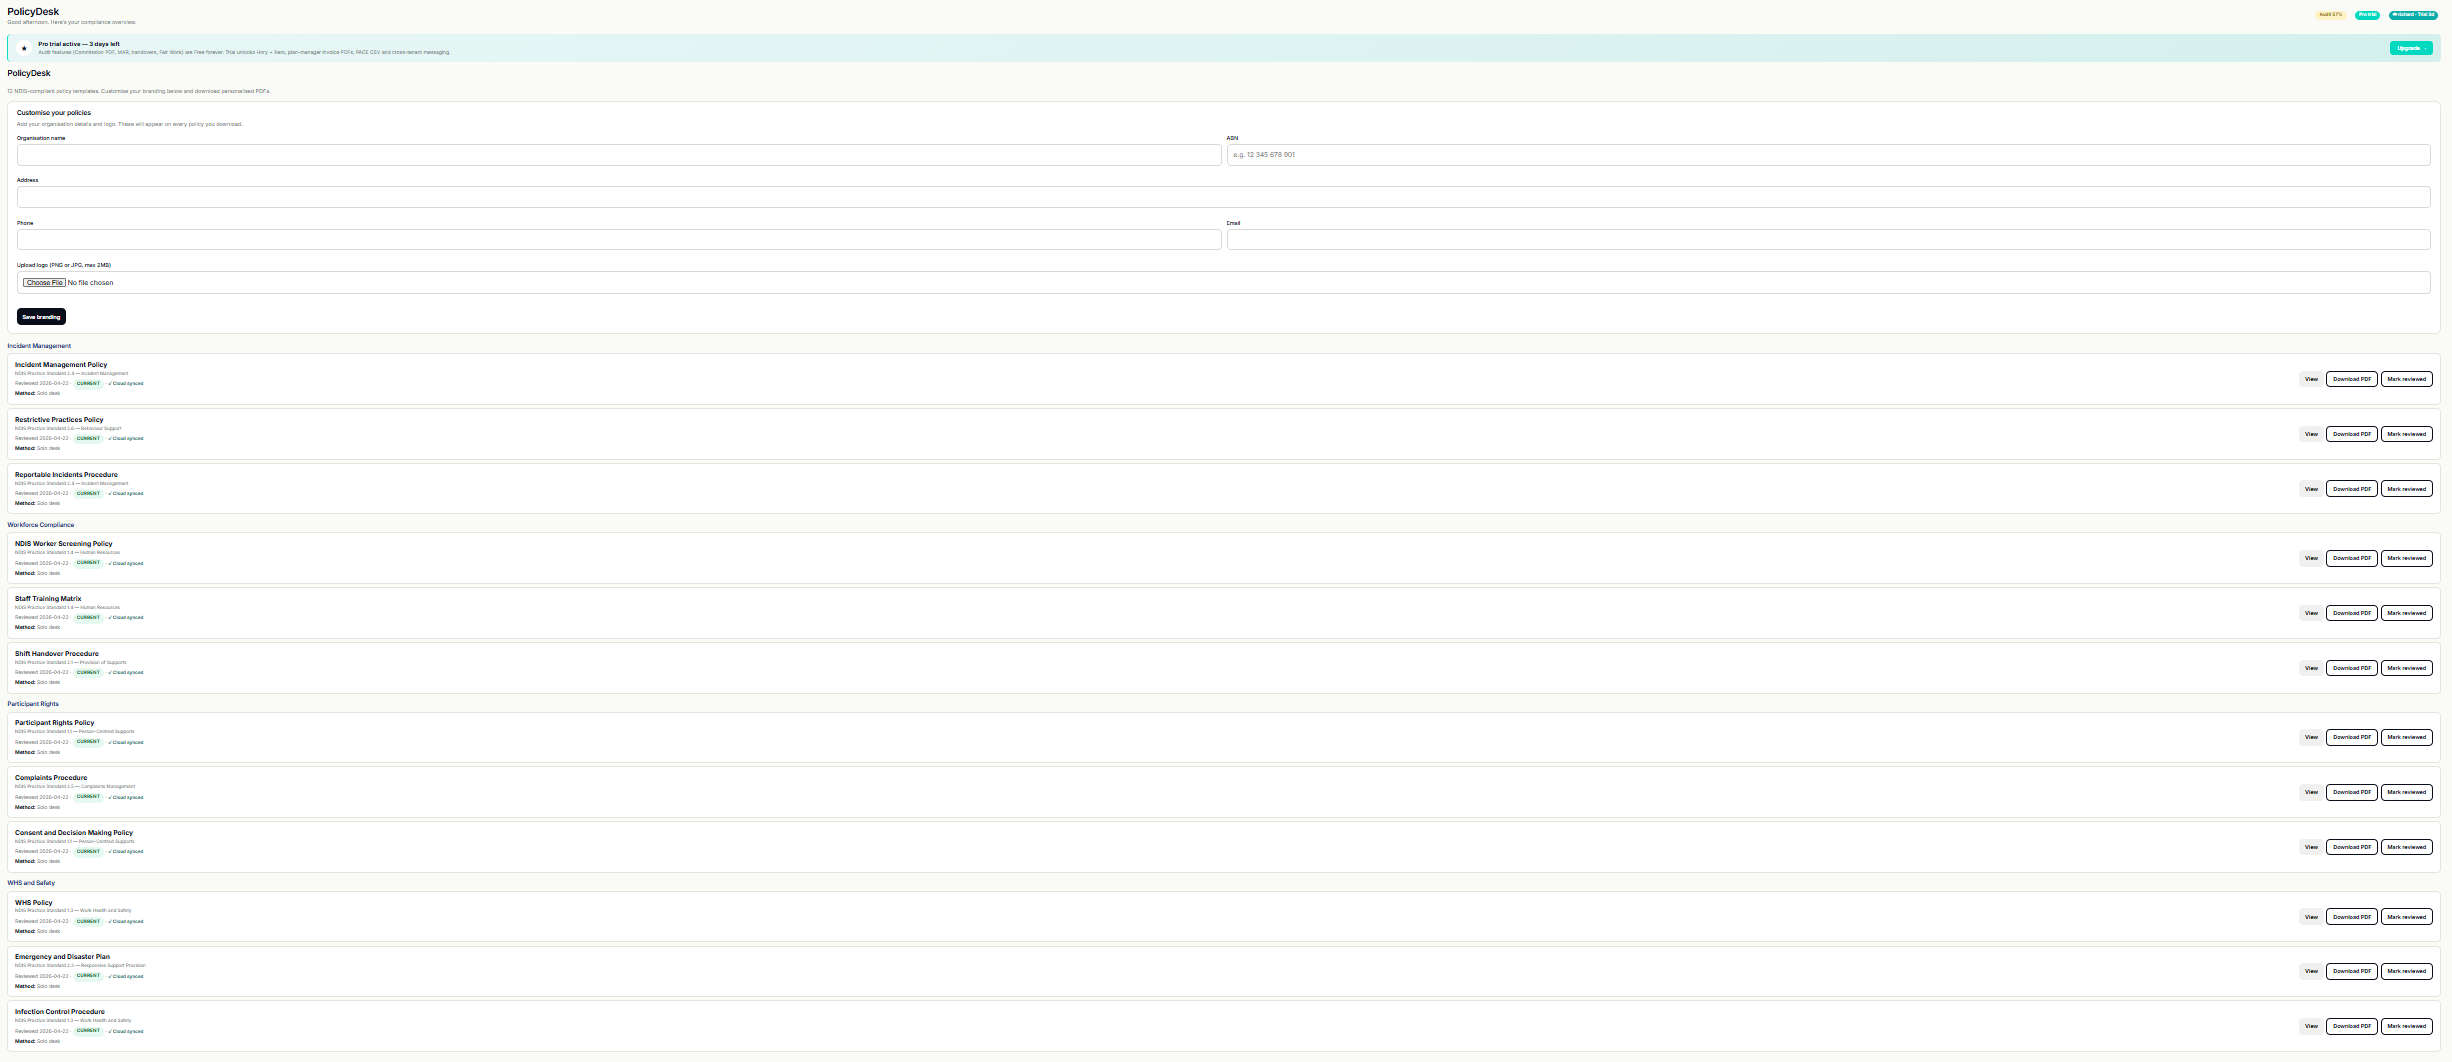
Marking a policy reviewed
- Open the policy card.
- Click Mark reviewed.
- (Optional) Add a review method note — "Reviewed at team meeting 23 Apr 2026, all staff present".
- Save. Next-due date is auto-stamped for 12 months out.
Admins can download any policy as a branded PDF for their evidence folder.
Commission audit PDF
One-click export of your whole compliance posture as a branded PDF, Commission-ready. Different from Audit Evidence (which is per-participant per-date) — the Commission audit PDF is org-wide, for registered-provider audits.
Generate from Reports → Commission audit PDF.
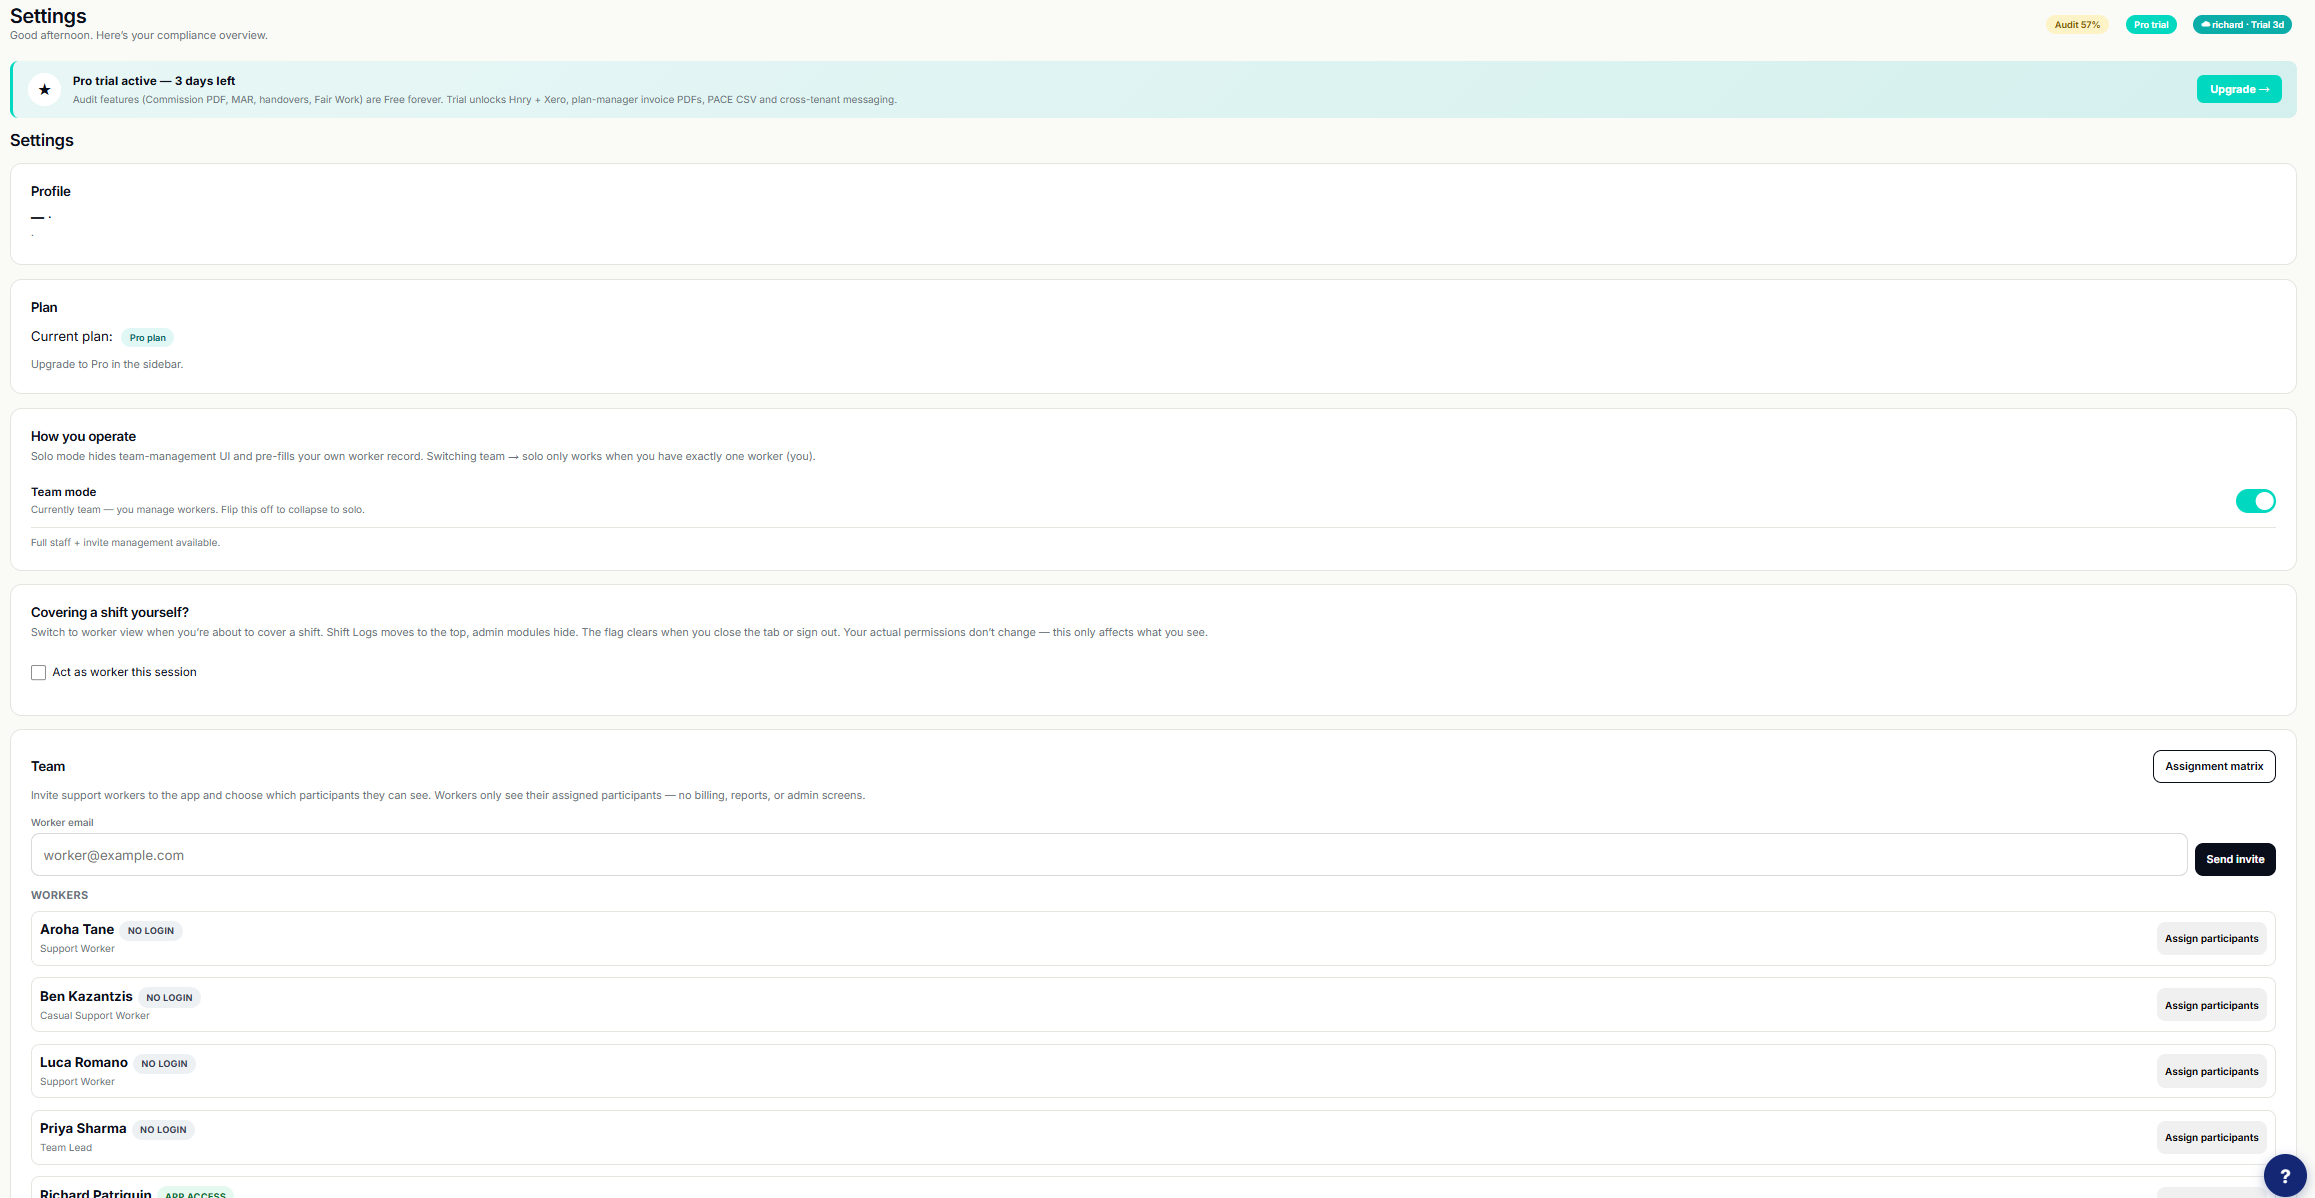
Organisation settings
Admin-only. Under the Settings sidebar item:
- Plan — your current caseload band, billing details, and Stripe customer portal link.
- Operating mode — solo / team (see above).
- Multi-hat — "Act as worker" toggle.
- Team — worker list, invites, assignment matrix.
- Organisation profile — name, ABN, address, email, phone.
- NDIS registration — registration number (appears on generated documents + evidence packs).
- Invoice + bank details — name, BSB, account number, payment terms, footer text. Embedded on every generated invoice PDF.
- Logo — PNG/JPEG/WebP, max 2MB, renders at 120×50px on the invoice header.
- Xero integration — connect / disconnect.
- Audit log — every important action, searchable.
Bulk CSV import
For onboarding many participants or workers at once. Max 100 rows per import.
Steps
- Open Participants or Staff, click Import CSV.
- Download the blank template if you don't have one already — ensures column names match exactly.
- Fill your data into the template, save as
.csv. - Choose your file. Aura validates the headers:
- If no recognised columns → "This doesn't look like a participants CSV." — check you're uploading the right template.
- If a required column is missing → explicit list of what's missing.
- If there are unrecognised extra columns → amber banner in the preview showing which ones will be ignored.
- Review the preview table. Rows with validation issues are flagged (row-by-row, with the specific field at fault).
- Click Import N rows. Valid rows are created; skipped rows are reported in the results screen.
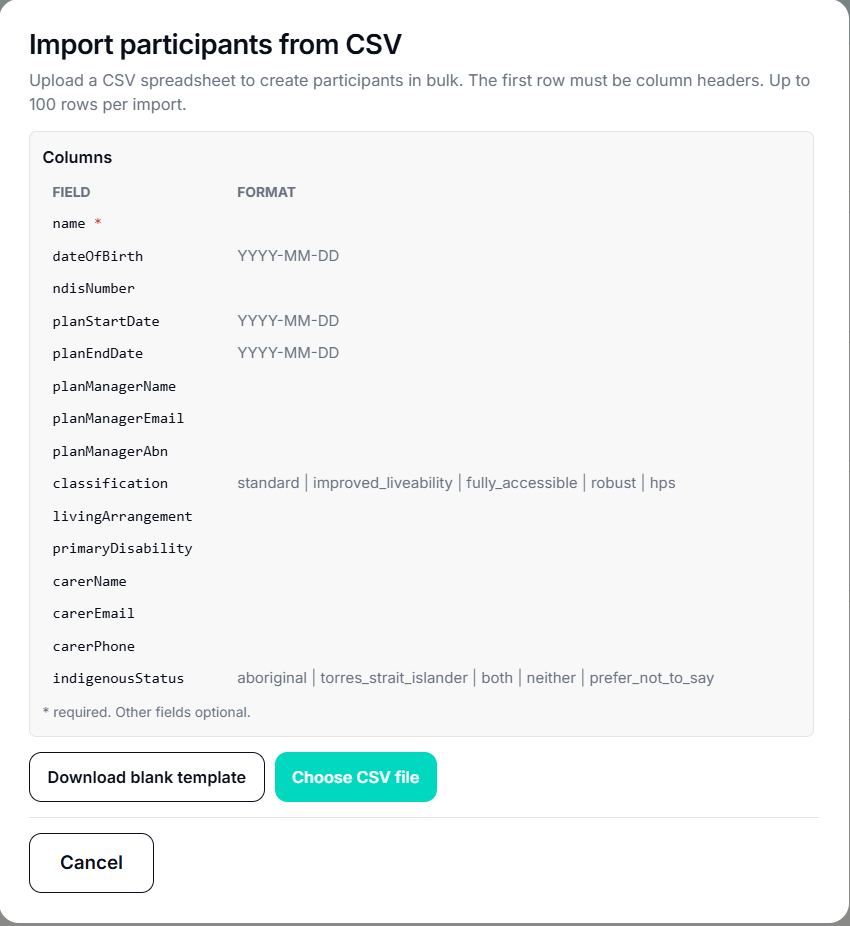
What's in the template
Participants: name, dateOfBirth, ndisNumber, planStartDate, planEndDate, planManagerName, planManagerEmail, planManagerAbn, classification, livingArrangement, primaryDisability, carerName, carerEmail, carerPhone, indigenousStatus. Only name is required.
Workers: name, roleTitle, email, phone, startDate, ndisScreeningId, ndisScreeningExpiry, employmentType. name + roleTitle are required. Payroll/bank/TFN fields are not imported via CSV — add those per-worker via the Edit modal for privacy reasons.
Common questions
I can't see the Add Worker button
You're either on solo mode (the button is hidden by design — switch to team in Settings) or signed in as a worker (admins only). Check Settings → Operating mode, or ask your admin to promote you.
My compliance score is stuck at zero
The score starts at a baseline until you have activity — at least one worker, one participant, one shift. Once data lands, the pillars populate within 30 seconds. Reload the Dashboard if it hasn't refreshed.
I marked a policy reviewed but the pillar still shows 0%
The compliance score is cached for 10 minutes to avoid hammering the DB. Either wait or reload the Dashboard — the pillar will update.
I generated an invoice but no DRAFT appeared in Xero
Check:
- Is Xero connected? Settings → Xero integration should show "Connected" + tenant name.
- Does the participant have a plan-manager name or email on their profile? (Pre-Generate warning catches this now; if you saw the confirm dialog, the skipped participants are listed.)
- Was the generated format Invoice PDF? PACE CSV batches don't push to Xero.
- Pulled straight from Xero — the invoice appears as DRAFT, not Authorised. Check the Draft tab.
A worker can sign in but sees no participants
They haven't been assigned yet. Admin: Settings → Team → Assignment matrix → tick their row against the relevant participants.
Why can't I delete a shift?
Signed-off shifts are protected — deleting them would break the audit trail. Admins can edit to correct details or mark as "cancelled" (which excludes from billing and compliance).
Sync & offline
Aura OS runs mostly in your browser. Actions sync to the cloud as you do them. If your connection drops:
- Shift check-ins, check-outs, handovers, and notes save locally and sync when the connection returns.
- Medication doses and incidents require connection at the moment (offline support is on the roadmap with the Capacitor wrap).
- If you see an amber "Offline — changes queued" banner at the top, your device is working but will retry automatically.
Force a sync
Sidebar → bottom → Sync now. Pulls fresh cloud state and replays any queued local changes.
Get support
Email hello@clearlinehealth.com.au from the email address on your account. Include:
- A screenshot of the issue.
- What you were trying to do.
Your account email address is enough for us to find you — we don’t need a Connect ID.
We reply within one business day. Founder reads every message.